
/dev/zero - page 2
The infinite stream
-
Making FileVault Use a Disk Password
To unlock a disk that is encrypted with OS X’s FileVault feature one needs to type in the password that belongs to any user on the machine who is allowed to unlock the disk. The system then boots and helpfully logs you in as that user. In general that is probably a convenient little feature, but for me it just makes things awkward – I want to use different passwords for unlocking the disk and logging into my user account. To make that work I have to create a second account dedicated to unlocking the disk, get logged into that one when the system boots, then immediately log back out so I can log in as the user I actually want to use.
Or do I?
The system that powers FileVault, Core Storage, combines full disk encryption and some logical volume management features in a manner similar to LVM and LUKS on Linux. As a dedicated user of those features on my Linux-based machines, I jumped at the chance to read more about OS X’s version only to discover next to no official documentation whatsoever. On the bright side, after searching some more and then playing around with it for a while I finally figured out how to make it do everything I wanted it to do, including using a disk password. You just have to boot into recovery (or, in my case, the OS X 10.9 install DVD that I threw together) and use the command line.
Create a partition
Since this is a laptop I want to put everything on one huge partition. The utility that handles nearly everything related to disk management on OS X,
diskutil, requires us to choose a type of filesystem for every partition we tell it to create, so for now we’ll just tell it to mark the partition as HFS+ and not bother to format it.# diskutil partitiondisk disk0 1 gpt jhfs+ %noformat% 100% Started partitioning on disk0 Unmounting disk Creating the partition map Waiting for the disks to reappear Finished partitioning on disk0 /dev/disk0 #: TYPE NAME SIZE IDENTIFIER 0: GUID_partition_scheme *256.1 GB disk0 1: EFI EFI 209.7 MB disk0s1 2: Apple_HFS 255.7 GB disk0s2The system actually created two partitions for us. The first is a small EFI system partition, which helps the system start, and the second is the big partition for our data that spans the rest of the disk.
Or does it?
# gpt show disk0
      start        end  index  contents
          0          1         PMBR
          1          1         Pri GPT header
          2         32         Pri GPT header
         34          6
         40     409600      1  GPT part - C12A7328-F81F-11D2-BA4B-00A0C93EC93B
     409640  499446368      2  GPT part - 48465300-0000-11AA-AA11-00306543ECAC
  499856008     262151
  500118159         32         Sec GPT table
  500118191          1         Sec GPT header
It seems to have left a little empty space in between the last partition and the boilerplate bits at the end of the disk. More on that later.
Create a volume group
The next step is quite familiar to LVM users. Before we can add encryption we need to create a logical volume group that combines one or more partitions (physical volumes) into a single virtual “disk” that we can slice up.
Why more than one disk? That’s how Fusion Drive works.
# diskutil cs create vg_sodium disk0s2
Started CoreStorage operation
Touching partition type on disk0s2
Adding disk0s2 to Logical Volume Group
Creating Core Storage Logical Volume Group
Switching disk0s2 to Core Storage
Waiting for Logical Volume Group to appear
Discovered new Logical Volume Group "A642DBC3-644C-4C23-8337-ADBCDD9C85F2"
Core Storage LVG UUID: A642DBC3-644C-4C23-8337-ADBCDD9C85F2
Finished CoreStorage operation

# diskutil cs list
CoreStorage logical volume groups (1 found)
|
+-- Logical Volume Group A642DBC3-644C-4C23-8337-ADBCDD9C85F2
    =========================================================
    Name:         vg_sodium
    Status:       Online
    Size:         255716540416 B (255.7 GB)
    Free Space:   255380987904 B (255.4 GB)
    |
    +-< Physical Volume A39FA7E9-F52F-4FFA-9A70-F07304111115
        ----------------------------------------------------
        Index:    0
        Disk:     disk0s2
        Status:   Online
        Size:     255716540416 B (255.7 GB)

# diskutil list disk0
/dev/disk0
   #:                       TYPE NAME       SIZE       IDENTIFIER
   0:      GUID_partition_scheme           *256.1 GB   disk0
   1:                        EFI EFI        209.7 MB   disk0s1
   2:          Apple_CoreStorage            255.7 GB   disk0s2
   3:                 Apple_Boot Boot OS X  134.2 MB   disk0s3
This changed the type of the second partition and constructed a volume group out of it, but it also created a third partition on which it can put whatever minimal data are needed to allow the system to boot from a Core Storage volume. With a quick look at the partition table we can see that it carved this out of the space it reserved at the end of the disk earlier:
# gpt show disk0
      start        end  index  contents
          0          1         PMBR
          1          1         Pri GPT header
          2         32         Pri GPT header
         34          6
         40     409600      1  GPT part - C12A7328-F81F-11D2-BA4B-00A0C93EC93B
     409640  499446368      2  GPT part - 48465300-0000-11AA-AA11-00306543ECAC
  499856008     262144      3  GPT part - 426F6F74-0000-11AA-AA11-00306543ECAC
  500118152          7
  500118159         32         Sec GPT table
  500118191          1         Sec GPT header
Create a logical volume
LVM has three layers: physical volumes, volume groups, and logical volumes. Since Core Storage includes encryption it adds a fourth layer, the logical volume family, between the volume group and logical volume levels. When you boot a FileVault-enabled system it’s the volume family that your password unlocks. The final step before we can install OS X is to create an encrypted volume family and the logical volume that we will actually install onto.
# diskutil cs createvolume vg_sodium jhfs+ 'Macintosh HD' 100% -passphrase
Passphrase for new volume:
Confirm new passphrase:
Started CoreStorage operation
Waiting for Logical Volume to appear
Formatting file system for Logical Volume
Initialized /dev/rdisk13 as a 238 GB case-insensitive HFS Plus volume with a 24576k journal
Mounting disk
Core Storage LV UUID: 46A6CA83-9CDC-4978-ADF2-E4DC3F203DBD
Core Storage disk: disk13
Finished CoreStorage operation

# diskutil cs list
CoreStorage logical volume groups (1 found)
|
+-- Logical Volume Group A642DBC3-644C-4C23-8337-ADBCDD9C85F2
    =========================================================
    Name:         vg_sodium
    Status:       Online
    Size:         255716540416 B (255.7 GB)
    Free Space:   0 B (0 B)
    |
    +-< Physical Volume A39FA7E9-F52F-4FFA-9A70-F07304111115
    |   ----------------------------------------------------
    |   Index:    0
    |   Disk:     disk0s2
    |   Status:   Online
    |   Size:     255716540416 B (255.7 GB)
    |
    +-> Logical Volume Family AC7B483C-0524-4ACF-8083-9EFD963F81A5
        ----------------------------------------------------------
        Encryption Status:       Unlocked
        Encryption Type:         AES-XTS
        Conversion Status:       Complete
        Conversion Direction:    -none-
        Has Encrypted Extents:   Yes
        Fully Secure:            Yes
        Passphrase Required:     Yes
        |
        +-> Logical Volume 46A6CA83-9CDC-4978-ADF2-E4DC3F203DBD
            ---------------------------------------------------
            Disk:                  disk13
            Status:                Online
            Size (Total):          255380987904 B (255.4 GB)
            Conversion Progress:   -none-
            Revertable:            No
            LV Name:               Macintosh HD
            Volume Name:           Macintosh HD
            Content Hint:          Apple_HFS
Now we have a disk called “Macintosh HD” that is encrypted with its own non-user-specific password, formatted, and ready to go. Just switch back to the OS X installer and let it run.
Create a recovery key
After the installer finishes and the system reboots we see the familiar FileVault login screen with just one option: “Disk Password.” Success! Now we just enter that, run through the usual first-time boot stuff, and finally open up a terminal to create a recovery key:
$ sudo fdesetup changerecovery -personal
Enter a password for '/':
New recovery key = 'XPO6-E4OL-XQG6-TGV9-GFOZ-GB8M'
Add more users
Since I generally don’t log in with an administrative account I created a second, regular user, but then the next time I rebooted I discovered a problem: the FileVault password screen asked for the disk password or the new user’s password. Thankfully, removing that user from the list of choices is simple:
$ sudo fdesetup remove -user gholmsOpen questions
Now that I have gone through all this my machine finally seems to be working exactly the way I want it to, but a few unanswered questions still remain in the back of my mind:
- How am I supposed to do this on a newer Mac that ships with neither an install DVD nor an upgrade application that I can turn into one?
- How do I make OS X stop automatically adding new users to FileVault’s password list?
- Where is the official Core Storage documentation?
Do know the answers to any of these? Leave a comment!
-
A Useful rtadvd Configuration
When most IPv6-capable computers join a network they attempt to automatically find a router on the network so they can figure out what addresses to use, how to set up routing, and so forth. On BSD systems like my router, the
rtadvd(8)program manages the router’s side of this exchange. Whilertadvdis rather flexible, its configuration file is frustratingly terse and its documentation assumes the reader has a fair amount of knowledge already.For IPv4, my network uses DHCP to hand out addresses and DNS information. When rolling out IPv6, I wanted to set things up similarly, but without managing addresses centrally with DHCP since machines can configure themselves correctly without one. Configuration like this is the sort of thing that I tend to forget and have to re-learn periodically, so for reference, the
rtadvd.conffile I used for that setup looked something like this:vether0:\ :addr="2001:db8:1221::":\ :prefixlen#64:\ :raflags#64:\ :rdnss="2001:db8:1221::1,2001:4860:4860::8888,2001:4860:4860::8844":\ :dnssl="internal.example.com":This makes machines configure themselves for the network
2001:db8:1221::/64, DNS domaininternal.example.com, and three DNS servers: a local one at2001:db8:1221::1, and both of Google’s public servers.The source of most of my confusion was figuring out the
raflagsoption.raflagsis a bit mask with two flags: M, which means a DHCP server manages addresses, and O, which means that non-address-related information (in this case, DNS information) is available that way even if addresses are not. This network setup requires the O flag to be set and the M flag to be unset, which meansraflagshas to be 64.Now that I’ve rolled this out I get all the niceness of auto-configuration without the need for a central DHCP server to keep track of addresses. Well, for IPv6, at least.
-
Mr. TV
I previously wrote about the big, Raspberry Pi-powered TV set at Eucalyptus HQ that displays the #eucalyptus-devel IRC channel so developers can always see what is going on and jump in if they need to. That setup has worked quite well for some time now, but I recently came up with a way to make it even better:
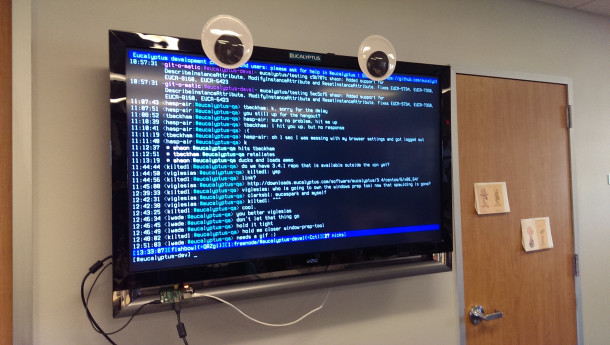
Googly eyes have yet to fail me at improving a machine’s appearance.
-
Making a Less-Limited USB Stick
The FAT32 filesystem is the closest thing we have to a universal standard for passing data around, but with the capacity of modern USB flash drives its 4 GB file size limitation has become problematic. exFAT is a popular contender for dealing with that, but the patent issues that surround it make true portability a pipe dream at best.
Enter UDF. As the filesystem of choice for DVDs and Blu-Ray disks, UDF support is ubiquitous. Appropriately-formatted disks are readable by operating systems dating back to the early 2000s. All that remains is figuring out how to format it. In general, there seem to be three important things to keep in mind:
- Remove all traces of previous filesystems. Different operating systems use different methods to detect what filesystems a disk contains, so ensure maximum reliability by eliminating potential sources of confusion.
- Format the entire disk, not just a partition. OS X seems to only look for UDF when the filesystem takes up the whole disk, as it does on DVDs, so overwrite the partition table before formatting the disk.
- Use the correct UDF version. UDF has a number of versions that add different features, but as you might expect, newer versions require newer operating systems. Windows XP will read up to version 2.01 out of the box, though some Blu-Ray drive manufacturers have released drivers for newer versions.
I formatted my most recently-purchased USB stick on Fedora. First off, I blew away the partition table and all traces of the FAT32 filesystem it came with:
# dd if=/dev/zero of=/dev/sdb bs=1M count=1
# wipefs -a /dev/sdb
Fedora uses the
mkudffscommand for creating UDF filesystems, which is part of theudftoolspackage:# yum install udftools # mkudffs --revision=0x0201 --media-type=hd /dev/sdbThat’s it! Now the disk seems to be usable on Fedora, OS X, and Windows, which covers just about all of my computers. I will test OpenBSD one of these days.
There are undoubtedly ways to do this on other operating systems. Feel free to comment with instructions for your favorite operating system if you know them.
-
Every DNS Server Should Support Aliases
Amazon’s Route53 DNS service, along with several content delivery networks and other DNS providers let one create an “alias” pseudo-record that causes the server to respond to requests for one name with results for another name. While the ways current implementations of this function vary a bit, the biggest difference between all of them and a
CNAMEis that while aCNAMEgets applied to every query regardless of the type of record something is looking for, an alias is specific to just one type of record.While this sounds like a trivial difference, the benefits are surprisingly enormous. The most obvious effect is that it lets you point a bare domain name (e.g.
example.com) at something else (e.g.www.example.com). The reason you can’t normally do this is because theCNAMErecord you would normally use to do this would conflict with theSOArecord at the top of your domain, but since the alias you would use for this only applies toAaddress records, this is no longer a problem.Another property aliases have is that they don’t actually go over the wire. While a CNAME record returns to the machine looking up a DNS name, causing it to restart its search with a different name, the answer for an alias comes right out of the DNS server’s own database. This means that aliases can only be used for records for which the server is authoritative or at least has some means of reliably learning the answer it should return, but that’s good enough for a great deal of use cases, notably including those of most content delivery networks. The fact that servers look up what an alias points to before they send anything over the wire means that they can include this functionality without violating standards – no one else needs to change their servers or their clients to support it. If DNS standards evolve to support it in the future, this makes transitioning even easier as that change rolls out.
In short, aliases would solve one of the most commonly-encountered shortcomings of DNS, namely its inability to use a CNAME to point a bare domain at its www equivalent. Given that there are multiple proprietary systems out there that do this already, it’s about time we standardized on an approach.